The speed and performance of your WP website play a significant role in the overall impression. In fact, it indicates how successful you are and how you care about your visitors. After all, your visitors aren’t going to like the long loading time of your website.
Due to the slow loading time, your site will reduce conversions along with tons of traffics. Even if it takes a few seconds more than the other side, some people will avoid your site entirely. That’s why a fast loading site bears higher chances of becoming more profitable and standing out amongst others.
Well, there are a bunch of things that can slow down your WordPress site. There can be several things that can be responsible for slowing your website down from too much traffic to too many photos and videos.
One the other hand, there is another thing that can slow down your site’s speed, remaining unnoticed most of the time. These are DNS (Domain Name System) lookups. Much like TTFB and network latency, it’s also an essential piece of the game that needs to be put on a correct position.
But the question is, how to reduce DNS in WordPress? What do you think is it going to cost you more and take the lion-share of your time?
Nah! It’s not; in fact, some simple and convenient steps can solve this problem permanently. Wanna learn? Okay, we’re gonna show you, but before we dive deep, let’s see what DNS actually is?
What is DNS Lookup?
In simple words, DNS (Domain Name System) is actually the bass of the internet. DNS lookup usually takes place when a visitor enters your website by searching your domain name on the internet.
Every domain is marked with an IP address. So, when anyone searches your website, it sends a request to the DNS, and then the server sends those requests back to the IP address.
Let’s make this clear with an example. When you type google.com in the address bar of your browser, the nameservers linked with that domain will be requested by your ISP. In this case, if you aren’t having any DNS, you’ve to type 216.58.212.110 (the IP address of google) to reach the site.
This method of translating and discovering which IP belongs to a website is the main purpose of DNS. This means a DNS lookup will have to look for every information provided by the domain before viewing or downloading any website’s resources through your browser.
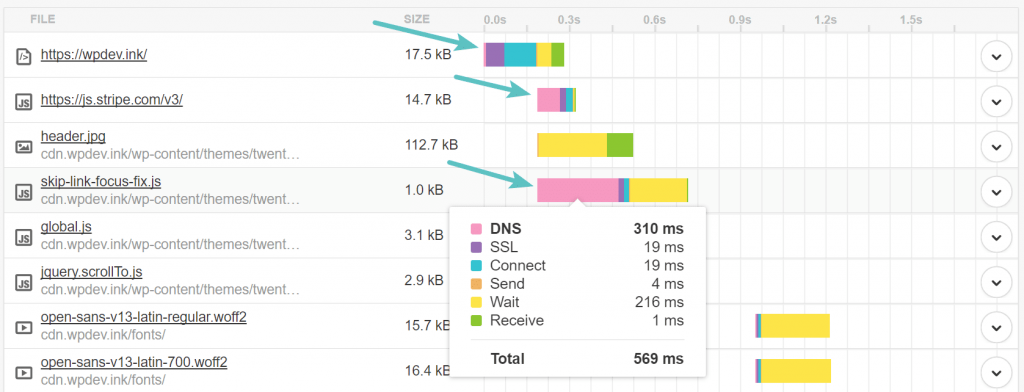
But each DNS lookup takes more than one second to complete the entire process, and that’s around ten times longer than Google’s recommendation. This is the thing you should really be worried about.
What’s the Appropriate DNS Response Time?
The perfect answer to this question is 40ms. If a DNS lookup takes 40ms to load, then it’s acceptable. So, make sure to achieve that or try to make it better.
Every website is different from one another, so this time frame isn’t going to fit all of them. The timeframe can be extended or reduced based on the website.
As an example, if you’ve got local visitors and a small number of audiences, you can make the job done with the higher DNS lookup times. But if you’ve targeted a global audience and your website has a large number of traffics, you must reduce the DNS response time and make it under 40ms.
In order to test the DNS response time of your website, you can use different tools, namely Pingdom, BIND, etc.

But it’ll be better if you keep in mind that Pingdom shows the exact DNS response time through the first test. Your site remains cached in Pingdom after that, so from the second test, it may show you zero ms. Therefore, it’s recommended to follow the first test when you’re using Pingdom specifically.
Okay, now, let’s see how to reduce DNS lookups.
Methods for Reduce DNS lookup in WordPress?
There is basically 3 ways to reduce dns look up in wordpress. Such as:
- Preload
- Preconnect
- Prefetch
What is Preload?
Preloading is telling the browser to load the static resources earlier. Like JS, CSS and etc. You can use preload tag to your scripts or styles as relation and implement preloading method. Add this code to your functions.php to add preload in your WordPress website
function add_rel_preload($html, $handle, $href, $media) {

    if (is_admin())
        return $html;

     $html = <<<EOT
<link rel='preload' as='style' onload="this.onload=null;this.rel='stylesheet'" id='$handle' href='$href' type='text/css' media='all' />
EOT;
    return $html;
}
add_filter( 'style_loader_tag', 'add_rel_preload', 10, 4 );
What is Preconnect?
Preconnect is something you load from other domains not your files. Like google analytics. You are loading google analytics from google’s cdn. So you have to add preconnect relation in script tag. This will boost dns lookup reduce.
<link rel="preconnect" href="https://anothersite.com">What is Prefetch?
The latency of DNS lookups can also be reduced by running a DNS prefetching process in the background.
It’s way more essential for Google Analytics, Google Fonts, Font Awesome, and much more.
So, if you’re willing to enable DNS prefetching on your website, just copy and paste the following codes:
<!-- DNS Prefetching -->
<link rel="dns-prefetch" href="//asset1.com">
<link rel="dns-prefetch" href="//asset2.com">
Make sure to replace the “asset1 and asset2.com” with your appropriate URLs. You can repeat the lines according to your needs and requirements.
What domain name to prefetch?
Now you know what is DNS prefetch and how to configure DNS prefetch in WordPress. Now question is how do you know what domain names you need to prefetch?
Well in that case, take the list of domains or use tools such as Pingdom to figure out what domain name you need to prefetch. Head over to Pingdom, enter your website and run the test.

How to Reduce DNS in WordPress?
So, have you tested your site? After the test, if you find that the DNS lookups time is longer than it should then follow these simple steps to resolve the issue:
Tip 1 – Use CDN or a Speedy DNS provider
There are several DNS providers out there, similar to the hosting companies. Some of the domain registers provide this DNS service for free. But a question remains about its reliability. After all, the quality varies with different providers, so you’ve to ensure a perfect one first.
Anyway, if you manage to find a reliable DNS provider, switch to them without any delay. It’ll help you to reduce DNS lookups. You can check the speed of your providers by using DNSPerf or DNS Speed Test.
In this case, some reliable CDNs (content delivery network) like Cloudflare, also works great for reducing DNS lookups.
A CDN is one type of connection between the browser and the website that serves as an intermediary. It uses a network of high-performance servers instead of just one available with usual hosting plans.
In addition to that, you can also use it to cache your website’s content. With the advantage of that, you’ll be able to optimize your WordPress site’s performance and improve its loading speed.
Tip 2 – DNS Caching and Its Advantages
Actually, this process is close to caching your WordPress site. You can use DNS caching to minimize the amount of DNS lookups. It’ll reduce the number of additional lookups for every corresponding page load.
Well, the settings of DNS caching can be achieved by adjusting the DNS record’s TTL (time to live) values. The TTL value indicates the length of the DNS cache. The higher TTL will lower the chance of another DNS scanning through the browser.
But this method may not suit all types of setups. For example, if the MX records of your website are set at higher values, it won’t allow you to receive the emails as quickly as needed. If this creates an obstacle for your business, then make sure to set the value lower than 12 hours.
Tip 3 – Enable Keep-Alive
Enabling Keep-alive is also an effective way to reduce DNS lookups. It establishes an active connection between the server and browser to reduce the load times.
Without the keep alive setups, there will be separated requests for different resources files, which extends the load time even though all the resources are in a single domain.
But when you’ve enabled keep-alive, all these files will be loaded within two requests only. Thus, the additional times will be saved, and the users will get a fast browsing experience.
Most of the browser supports keep-alive, and it’s found to be enabled by default. But if it’s not enabled, you can check out our article for proper guidance on how to enable Keep-Alive in WordPress site.
Tip 4 – Relocate to Use Fewer Hostnames
Once you’ve activated keep-alive, you can merge or relocate as many services as possible under fewer hostnames.
You may not be able to combine everything under one hostname, indeed. But still, you’ll be able to relocate some of them, like stylesheets and more.
Tip 5 – Using Plugin
This is an advance technique for speed optimization. That’s why most of the speed optimization plugins doesn’t offer this feature as free in their’s free version. But I found two free plugins these are really effective for reducing DNS lookup. They are:
Wrapping Up
A fast loading website has greater benefits. It not only provides the users with their desired browsing experience, but it also benefits your SEO rankings. Even it also reduces the bounce rates of your website.
According to Google, around 45% of visitors never return to sites that take longer time to load. This means if your site is having this issue, you’re surely losing tons of visitors, especially the one who loves your content.
That’s why you must pay proper attention and solve every single aspect responsible for extending your site’s loading time. So, you can’t also ignore DNS lookups. So, how to reduce DNS in WordPress? Is it clear to you now? Hope the above guidelines will be helpful for you to clear the facts. If you still got any questions, feel free to comment on us below.


